Plantar Fasciitis | Heel Pain | Self Help

The plantar fascia supports the arch of the foot and if strained, becomes weak, swollen and inflamed
Plantar Fasciitis is the most frequent injury of the plantar fascia and refers to an inflammation of a thick band of tissue that runs across the bottom of the foot and connects the heel bone to the toes.
The plantar fascia supports the arch of the foot and if strained, becomes weak, swollen and inflamed. Repeated strain can bring about small tears in the ligament causing pain and swelling.
Repeated injuries to the plantar fascia seem to be the main cause of plantar fasciitis which can develop in one or both feet.
Plantar Fasciitis - How To Treat Your Own Trigger Points
Trigger Points
Interestingly, plantar fasciitis almost always generates a pain map that emanates from trigger points in the quadratus plantae, soleus, and gastrocnemius muscles.
Treating these trigger points should provide both short and long term relief.
As is often the case with trigger points, the therapy works best when the client continues to perform self help procedures between treatments.
Below you'll find some examples of self help that we will often prescribe when treating this condition:
1. Gastrocnemius (calf muscle ) stretch

• Stand on the edge of a ledge (somewhere sufficiently stable to support your bodyweight)
• You will need to have enough of your foot on the edge of the ledge so that it does not slip off. Make sure you are stable, this will allow you to hold your stretch for a longer period (better quality of stretch)
• Lower both heels over the edge of the ledge
• Try lowering one leg at a time. This increases the weight on the calf muscle and increases the intensity of the stretch
• You should feel the stretch move lower and to the inside of the shin
• Hold stretch for between 30-50 seconds, 3 times each side every two to three hours
2. Soleus Stretch

• To stretch the soleus muscle the back leg should be bent
• Place the leg to be stretched behind and lean against a wall keeping the heel down
• If this stretch is not felt then try to place the forefoot of the front leg against the wall with the heel on the floor and push the front knee towards the wall
• Hold for 30-50 seconds repeat 3 times one each leg. 3 times each side, twice daily
3. Stretching the deep foot flexors
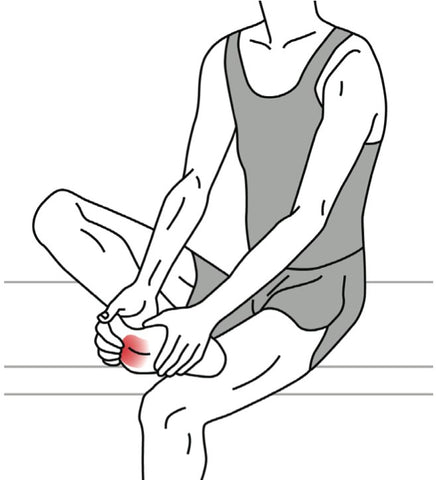
• In sitting position, gently hold foot with one hand
• With the opposite hand pull all five toes up towards the body
• Hold for 30-50 seconds, twice each side, twice daily
4. Towel lifts

• Place a hand towel on the floor. The towel should be completely flat
• Stand with your foot over the towel and use your toes and the bottom of your foot to scrunch up the towel
• Next use your toes and feet to flatten the towel
• Repeat 10 times, 3 times daily
5. Taping
There's a lot of conflicting talk around taping and not too much evidence. In our experience, taping is often a useful adjunct to the treatment process, and clients certainly seem to feel the benefit.
One thing for sure, is that there's absolutely no harm in it so long as you're careful with the scissors!
We don't recommend taping too often for self help, but this is quite an easy area to tape and most clients seem to manage it quite well.
We'd always recommend getting a friend or partner to help even if it's just to hold the scissors, or prepare the next piece of tape.
Most pharmacies stock kinesiology tape nowadays, and they should be able to recommend the right tape for you.
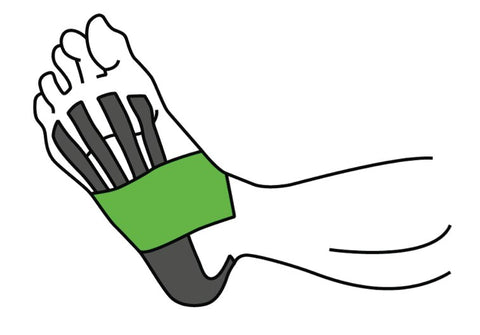
Taping Technique for Plantar Fasciitis - Video
1. Measure tape from heel from the ball of the foot and cut to that length. Cut it into to four tails leaving the last 2 inches uncut as an anchor (you can use a solid strip if you have a problem with the tails loosening)
2. Flex your foot pointing your toes up, and anchor the 2 inch base to the heel
3. Apply the tails towards your toes with no stretch
4. Measure another piece of tape around your foot
5. Anchor this strip at the outside top edge of your foot. Tape from outside to inside to support the arch, pulling up a little with the tape at the end
6. Lay down the end with no tension on the top of your foot
7. Gently run over the tape with hand to provide some pressure. Tape should stay on for a few days , thereafter it will start to peel. At this point it can be removed and re applied with a new strip
EDUCATION MEMBERSHIP PLANS
UNLIMITED ACCESS
FROM $19.95/monthly

Trigger Point Therapy Diploma Course

Clinical Reasoning and Assessment for Manual Therapists
This trigger point therapy blog is intended to be used for information purposes only and is not intended to be used for medical diagnosis or treatment or to substitute for a medical diagnosis and/or treatment rendered or prescribed by a physician or competent healthcare professional. This information is designed as educational material, but should not be taken as a recommendation for treatment of any particular person or patient. Always consult your physician if you think you need treatment or if you feel unwell.
About Niel Asher Education
Niel Asher Education (NAT Global Campus) is a globally recognised provider of high-quality professional learning for hands-on health and movement practitioners. Through an extensive catalogue of expert-led online courses, NAT delivers continuing education for massage therapists, supporting both newly qualified and highly experienced professionals with practical, clinically relevant training designed for real-world practice.
Beyond massage therapy, Niel Asher Education offers comprehensive continuing education for physical therapists, continuing education for athletic trainers, continuing education for chiropractors, and continuing education for rehabilitation professionals working across a wide range of clinical, sports, and wellness environments. Courses span manual therapy, movement, rehabilitation, pain management, integrative therapies, and practitioner self-care, with content presented by respected educators and clinicians from around the world.
Known for its high production values and practitioner-focused approach, Niel Asher Education emphasises clarity, practical application, and professional integrity. Its online learning model allows practitioners to study at their own pace while earning recognised certificates and maintaining ongoing professional development requirements, making continuing education accessible regardless of location or schedule.
Through partnerships with leading educational platforms and organisations worldwide, Niel Asher Education continues to expand access to trusted, high-quality continuing education for massage therapists, continuing education for physical therapists, continuing education for athletic trainers, continuing education for chiropractors, and continuing education for rehabilitation professionals, supporting lifelong learning and professional excellence across the global therapy community.

Continuing Professional Education
Looking for Massage Therapy CEUs, PT and ATC continuing education, chiropractic CE, or advanced manual therapy training? Explore our evidence-based online courses designed for hands-on professionals.

